-A Lens
With a View: Part 6-
by Robert A F
van de Voort
This and the following articles will introduce the view camera
to the reader who is completely unaware of the possibilites, the
surprises and ease of use of the big black box, my favourite working
tool.
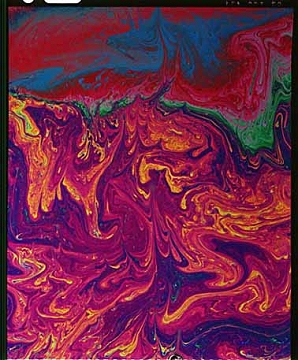
Remember when we were young and played with the soapy bubbles? Those
beautiful colours when we caught them in the right light…we
can create these colours now again but it is not children's play
anymore.
 We know enough now of my fab (and yours?)
magic box to have some "childish" fun with it. I want
to do something that only the view camera can do and lets have
an in-depth look how we get these fantastic images on film.
We know enough now of my fab (and yours?)
magic box to have some "childish" fun with it. I want
to do something that only the view camera can do and lets have
an in-depth look how we get these fantastic images on film.
How do we get these soapy colours visible? The normal round bubble
is total see through, and only reflection of the skin of the soapy
film will show the colours of the emulsion of the bubble. We have
to shape the bubble into a reflection surface to show them. I
used a metal 10 x 12 cms film holder to process my sheet films
in. I dipped my metal frame in the soapy liquid (water and normal
commercially dish washing liquid concentrate) and got a soapy
film stretching to all four sides of the frame.
The film is transparent; you can look right through it. To reflect
a surface we have to do something similar like we do to photograph
mirrors. If you place a light bulb in front of the mirror you
light up the mirror and you see a magnificent light bulb reflected.
If you want to show the mirror as a mirror, we have to reflect
something that is the opposite of the light bulb. Place a see
through reflection panel bigger than the mirror in front of the
mirror, the light bulb behind the whole see through panel. It
will now act like a big even light source and it will reflect
as a more or less an even surface in the mirror.
In a similar fashion, if you point a light bulb or small flash
to the soapy film surface it will reflect as a point source in
the soapy film as a bright spot. You will not see a reflection
of the light over the whole surface of the soapy film.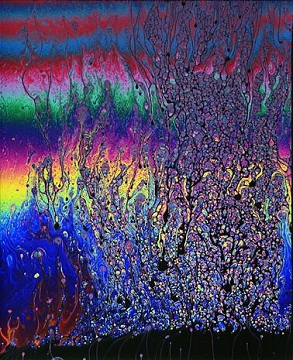
Ok, now we know how to light that soapy stuff. We bring a soft
box that is decidedly bigger than our 10 x 12 cms frame in front
of it and we will see the beautiful soapy colours. These colours
are created when the light enters the soapy suds and the minute
differences in the thickness of the soapy film you get different
light phases like a prism. The thinnest pieces do not refract
much light at all; you normally find these thin areas at the edges
of your metal frame. The colour of your background will be than
visible. I recommend you use a black surface as a background,
as matt black as possible because you are aiming your light box
straight at it. Move your black background as far as possible
away from your metal holder with the soapy suds. As the light
travels further behind your soapy film it gets weaker and weaker
the longer it travels from its light source, this will minimise
any light reflecting from your background.
The soapy film is very fragile and does not last long; you may
have to experiment with the amount of your dish washing concentrate
liquid you add to the water. The age of your solution, the ambient
temperature and humidity of the air in the studio all add up to
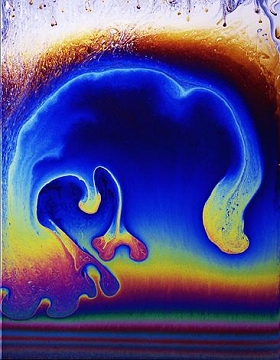
the difficulties of extending your soapy film's life span. How
infuriating it has been to see my colours of the soapy film arrange
them self in a wonderful pattern to explode into oblivion just
when I pressed the shutter. However, there is a blessing to that
 unfortunate incident. Since you have photographed
"nothing" (your soapy film exploded) and the black background
did not receive any light, you can expose that film inside your
view camera again.
unfortunate incident. Since you have photographed
"nothing" (your soapy film exploded) and the black background
did not receive any light, you can expose that film inside your
view camera again.
Of course, when you have photographed the frame around it because
you could not get close enough the metal frame that holds your
soapy suds will over expose but your bits inside the frame will
not when you expose your sheet film again inside the camera….
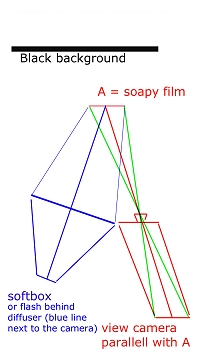
Now we come to the difficult bit, to see these colours of the
soapy film we have to place our soft box slightly on an angle
opposite the frame that holds our soapy film. To see the reflection
of the light on the soapy film the film plane of our negative
or transparency has to sit parallel with the frame that holds
the soapy film. If you place your view camera similar like my
diagram, you will have no problem to see the brilliant colours
on your viewing screen.
How to expose for this event? Since the substance we are photographing
is see-through, we cannot take a reflected light reading. A grey
card held in the position of A will tell you the amount of light
reflected of the card and will give you an exposure reading. However,
the view camera has an extension of "whatever centimetres"
between lens and negative. We have to take the loss of light into
account after the light has travelled from A to the lens. In a
35 mm camera there is no light loss because the negative sits
so close behind the lens. In our view camera the distance could
be quite a lot.
 The formula to arrive at the amount of
light loss in F stops measure the following:
The formula to arrive at the amount of
light loss in F stops measure the following:
Bellows extension = distance between lens and negative in the
back is say 30 cms
Your lens to shoot it with is 150mm (standard lens for a 10 x
12 cms view camera)
The bellows extension length as measured = 300 mm
Divide this number by your focal length of the lens (150mm) 300:150=
2
Open your aperture two stops…. Simple?
Clever people will notice that any bellows lens distance equal
or lesser than the focal length of the lens used will have no
effect on the exposure….
Do not go bananas and start getting too critical; close enough
is good enough when you are shooting colour negative material.
If you are going to shoot transparency, I advise you to measure
reasonably accurate. Shoot two sheets with the same exposure.
Let your lab process sheet one normal; hold the other sheet until
you have seen the first sheet. Than if the image is too dark or
light, let the lab push (make the transparencies brighter) or
pull (make the transparency darker). They should be able to advise
you how much or how little. Most labs do not charge more for this
service.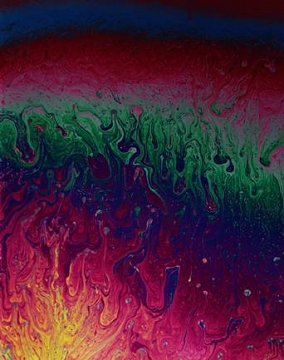
Another formula to arrive at the correct exposure when you have
a some bellows extension use this formula:
(bellows extension distance in mm)2 divided by (focal length
of lens used in mm)2 = bellows extension factor.
Unfortunately, extension factors are not the same as F-stops.
For example, an Extension Factor of 2 is one stop (open up more)
EF of 2.8 is 1.5 stop
EF of 3 is 1.6 stop
EF of 4 is 2 stops
EF of 6 is 2.6 stops
EF of 8 is 3 stops
EF of 16 is 4 stops ...get the feel?
If you like to read more info on technical formulas relating
to the fab black box view this web page http://www.johndesq.com/formulas/formulas.htm
PS After all this technical hoohaah, you still like to play with
those bubbles?
Enjoy!
Perhaps you can come up with something more exciting than my
straight metal frame to put the soapy film in…tell me about
it…….after all I have told you a few things now….Viewing
you next month.
This article was first published in the Photographers Mail - New
Zealand - July 2001. Article copyright Robert A F van de Voort 2001,
can be reproduced unabridged with reference to author.
Lens With a View Series:
Article: 1
2
3
4
5
6
7&8
9
10
11
12
Hey guys, any questions or comments? It is so hard to explain a
view camera on paper and such joy to experience in real life that
words sometimes are failing me to explain it nicely. All the responses
received have been positive, thank you all for your feedback! Readers
are invited to view some of my escapades into photography on
www.AlbanyStudios.co.nz or send Email to me at hotshot@ihug.co.nz
with your questions.

Robert van de Voort is a professional photographer and writer,
with his headquarters located on the North Island of New Zealand.
Robert's professional photographic career spans the course of
over 20 years, with work in stock, advertising, studio, digital
photography and much more! You can learn more about Robert and
see examples of his stunning work by visiting his website at www.AlbanyStudios.co.nz.
The staff at Profotos.com
would like to thank Robert for his generous article contributions!