-A Lens
With a View: Part 11-
by Robert A F
van de Voort
This and the following articles will introduce the view camera
to the reader who is completely unaware of the possibilites, the
surprises and ease of use of the big black box, my favourite working
tool.
The view camera has always had a special place in my studio,
taking it outside is a bit of a novelty for me because most of
my work is commercial and inside the studio. The Sinar has a bit
of a problem, a P2 expert outfit does not easily convert to a
field camera, it can be done but in this case the Editor of the
Photographers Mail, Brian Curtis, came to my rescue and lend me
his view camera and paraphernalia to take outside.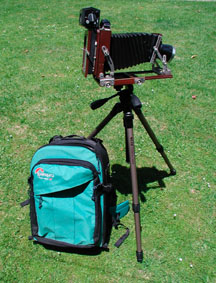
In this article I like to show what I like to take with me as
basic equipment to take outdoors and how to take the light meter
readings.
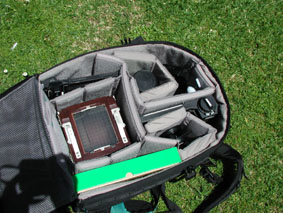
The ideal package consists in my particular case of a Lowepro
back pack, filled with Brian's field camera, a 360 mm lens, a
90 mm lens, (I like extremes!). A Polaroid 545 back film holder
to take sheet film, a Sinar Vario back, a Gossen light meter,
a Silk carbon fibre tripod (the weight is nothing compared to
my Benbo a 10 kg three legged affair), a box of Fuji Velvia sheet
film, a black cloth to disappear under to view the magic upside
down images, a cable release and if you can come up with any other
essentials fine, but this should cut it. See photo below to see
the content of the backpack.
 The
Vario back of Sinar allows me to take pictures on 120 roll film
in various sizes, from 6x4.5 cms to 6x6, 6x7, 6x9, 6x12 cms! This
will give me a great variety of focal lengths with the various
film formats! Of course it you like to shoot 10 x12 cms negatives
or transparencies, you need the double sided dark slide holders
that take one sheet of film on either side. This also requires
you to load the films in advance in the studio and takes up quite
a bit of space in your pack, that is why I used the roll back
film holder and the Polaroid film back holder for the individual
10 x 12 cms shots on the Velvia sheet film. The extreme focal
lengths and the various film formats provide quite a few different
photographic opportunities. I feel quite well in my selected outfit,
it fits easily in the pack and the weight is negligent, a bottle
of fine red wine is easily included to rest and contemplate further
shots if required…
The
Vario back of Sinar allows me to take pictures on 120 roll film
in various sizes, from 6x4.5 cms to 6x6, 6x7, 6x9, 6x12 cms! This
will give me a great variety of focal lengths with the various
film formats! Of course it you like to shoot 10 x12 cms negatives
or transparencies, you need the double sided dark slide holders
that take one sheet of film on either side. This also requires
you to load the films in advance in the studio and takes up quite
a bit of space in your pack, that is why I used the roll back
film holder and the Polaroid film back holder for the individual
10 x 12 cms shots on the Velvia sheet film. The extreme focal
lengths and the various film formats provide quite a few different
photographic opportunities. I feel quite well in my selected outfit,
it fits easily in the pack and the weight is negligent, a bottle
of fine red wine is easily included to rest and contemplate further
shots if required…
To take light readings outdoors is a bit different from my studio
practice, the flash is now not my main light source, continuos
daylight or the absence is. Once the lens is focused on infinity
there is no problem calculating the exposure, whatever the light
meter says is correct. No bellows extensions are needed to take
into account.
As long as you take an incident reading of the scenery to be
photographed, (aim light meter towards lens with the white dome
over the lens of the light meter) or an reflected light meter
reading of your selected grey area or mid tone, this could be
a grey card reading of 18% reflectance or your selected Zone V
of the area you find qualifies to be your mid grey tone. Of course
you will now have removed the white dome of your light meter and
aim the lens of your light meter towards the object or subject
of your desires…
If you are using the camera to photograph anything nearer the
camera than infinity, you will have to move the lens further from
the image panel. This will increase the bellows extension and
the light has to travel further from the lens to the image panel
to create an image on the negative. There are formulas to work
out the increase in exposure based on the length of the bellows
and focal length of the lens used, see one of my previous articles
for all the gory details. If you do not like to work with formulas,
I discovered a handy little gadget on the Internet to assist you
to take light readings without getting your brain frazzled. It
is called a quickdisk, a circular disk that I printed from the
downloaded website.
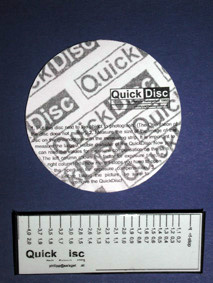 With
this disk you also get a little ruler printed out. If you mount
both on some hard board or stiff card board you see what I mean.
To work out the bellows extension, you place the disk in the image
area you are viewing, place it in the focussed zone, and then
measure the diagonal of the disk projected on the ground glass
with the ruler. The ruler will show you how many F stops to increase
your exposure or indicate the filter factor to lengthen the exposure.
You can download a free copy of this quickdisk at: phillip@salzgeber.at
With
this disk you also get a little ruler printed out. If you mount
both on some hard board or stiff card board you see what I mean.
To work out the bellows extension, you place the disk in the image
area you are viewing, place it in the focussed zone, and then
measure the diagonal of the disk projected on the ground glass
with the ruler. The ruler will show you how many F stops to increase
your exposure or indicate the filter factor to lengthen the exposure.
You can download a free copy of this quickdisk at: phillip@salzgeber.at
Life can not be easier…to make things a little more interesting
you can work out the range of your exposure on the film if you
can take a reflected light meter reading.
Imagine you have seen that the bark on the tree resembles your
zone V or 18% grey card! You take the reflected (not incident!)
reading and place this reading on your camera shutter and aperture.
Now you will try to assess the very dark tone in the image, perhaps
the shadow of that tree on the ground. If in the reflected mode
that reflects say 3 stops less than the reading of the bark, it
will be black! Why would it be black? Follow this logic:
18% reflectance is the calibrated meter reading response of all
light meters, 35mm or whatever, in the reflected light meter mode
all light meters will respond to base their exposure on the basis
of having "seen" a 18% reflected grey card tone. This
18% grey could be the full moon, blue sky, your white teeth or
black shoes…you are still with me? Okay here goes, if it
reads one stops less reflectance equals 9% reflectance it is a
darker grey… it reads 2 stops less reflectance equals 4.5%
reflectance it is a really dark, almost black grey. If it reads
3 stops less reflectance, 2+ % reflectance it is almost black
or black, you can keep on dividing this 18% by two but you will
never get to 0% reflectance mathematically, but take it from me
that 2% reflectance is a nice dark tone, a nice furry black.
On the other side, the sun on the leaf in the image should reflect
more light, imagine one stop more than measured on the bark, our
first reading (and set on the camera!); one stop more is equal
to 36% (18 + 18), thus it will create a lighter grey on the image.
If it would record 2 stops more reflectance than the reading
on the bark, 36+36 =72% it will generate a very bright grey, a
white with a little detail. If it reflects 3 stops more light
than our first reading on the bark, (72+72=144%) theoretically
we should get a bloody white light shining from our photo….
Of course a 144% reflectance is impossible, only a light bulb
could do that, but you get the drift, three stops more reflectance
than your original exposure setting will make a nice white area.
You have now a magic tool that will place your light values where
you want them to be, the important first step is where do you
consider your midtone (18% grey reflectance) to be? Measure the
other values of importance, like shadow and highlights areas as
above and you will know -3 is black, and +3 is white.
The view camera is a bit more limited in its movements compared
to my Sinar, but even without all the "bells and whistles"
of the Sinar, this camera gives far more flexibility and creativity
then the fixed body jobs of the Mamiyas and similar cameras to
allow a very creative approach in pictures. See picture 2 for
my set up with the long 360 lens.
The lens is heavy but the controls are just about strong enough
to hold everything quite motionless, the tripod, despite its feather
weight offers an incredible stable base, I had my fears when I
picked up this feather light tripod. Almost dismissed it on basis
of its weight compared to me using a 10 kilograms Benbo heavy
tripod, but technology has improved considerably and so has the
price!
I hope to give you next month some visual clues on how I arrived
in achieving my visual imagery, but at least this should set you
on the road to experiment. Unfortunately personal circumstances
prohibited me to have my photos ready in time for this issue,
next month we'll have more!
Meanwhile you are welcome to mail me comments at hotshot@ihug.co.nz
and if you have shot a masterpiece, why not send it to me so I
can show your work on my gallery page on my website or on one
of the galleries on this site?
I gladly will comment on your work if you think I am qualified
enough.
Article copyright Robert A F van de Voort 2001, can be reproduced
unabridged with reference to author.
Lens With a View Series:
Article: 1
2
3
4
5
6
7&8
9
10
11
12
Hey guys, any questions or comments? It is so hard to explain a
view camera on paper and such joy to experience in real life that
words sometimes are failing me to explain it nicely. All the responses
received have been positive, thank you all for your feedback! Readers
are invited to view some of my escapades into photography on
www.AlbanyStudios.co.nz or send Email to me at hotshot@ihug.co.nz
with your questions.

Robert van de Voort is a professional photographer and writer,
with his headquarters located on the North Island of New Zealand.
Robert's professional photographic career spans the course of
over 20 years, with work in stock, advertising, studio, digital
photography and much more! You can learn more about Robert and
see examples of his stunning work by visiting his website at www.AlbanyStudios.co.nz.
The staff at Profotos.com
would like to thank Robert for his generous article contributions!