Alien Skin's "Exposure"
a software review by Larry Davis

Where has all the film gone?
 With
the advent of digital photography, most photographers are now
trading in their old film bodies for high tech digital cameras
utilizing CCD and CMOS sensors as their "film" to capture
images. Gone are the days when we used to purchase Fuji Velvia
to create vivid landscape photographs, Kodak T-MAX 3200 for low
light situations and high grain output, and cross processed E6
film in C41 chemicals for that otherworldly look. Sure, we can
still purchase these films for the film cameras, but how many
of us even own a film camera nowadays? My Hasselblad's were sold
a few years ago and all I have remaining are an old Nikon 35mm
body and a 4x5 view camera, both of which are collecting dust
in the back of my closet. I even have a pile of 4x5 sheet film
and several rolls of 35mm film laying around somewhere that have
never been used. If you are like me, you probably miss the days
of experimenting with different film types in your cameras to
see what type of effect you could achieve in your photos.
With
the advent of digital photography, most photographers are now
trading in their old film bodies for high tech digital cameras
utilizing CCD and CMOS sensors as their "film" to capture
images. Gone are the days when we used to purchase Fuji Velvia
to create vivid landscape photographs, Kodak T-MAX 3200 for low
light situations and high grain output, and cross processed E6
film in C41 chemicals for that otherworldly look. Sure, we can
still purchase these films for the film cameras, but how many
of us even own a film camera nowadays? My Hasselblad's were sold
a few years ago and all I have remaining are an old Nikon 35mm
body and a 4x5 view camera, both of which are collecting dust
in the back of my closet. I even have a pile of 4x5 sheet film
and several rolls of 35mm film laying around somewhere that have
never been used. If you are like me, you probably miss the days
of experimenting with different film types in your cameras to
see what type of effect you could achieve in your photos.
Alien Skin Exposure to the rescue!
Fortunately, for those of us who enjoy experimenting with film
types for different looks in our images, or for those who would
shoot one type of film for specific shooting situations, Alien
Skin Software recently released their "Exposure" plug-in
software to mimic and closely replicate old school film. As a
plug-in for either Adobe Photoshop, or Jasc Paint Shop Pro, Exposure
is easy to use and even easier to install.
What's in the box?
Exposure ships in what looks like a VHS video case, which seems
to be Alien Skin's way of reminding us about the program's abilities
to take us back to an analog world through this unique software.
They seem to have ditched the CD / DVD cases and opted instead
for a big plastic box that reminds me of the days of analog videos.
Is this packaging scheme coincidence? Did Alien Skin get a break
on these big boxes from a supplier? Maybe it's just a subtle marketing
approach? Okay, enough about the box :-)
Inside the retail box we find an informative instructional booklet
with a handy "cheat sheet" of keyboard shortcuts on
the back cover. Yes, Exposure has keyboard shortcuts built into
it for quick editing and you can define your own shortcuts. You
can even save and email the shortcuts to your friends - more on
this later. Lastly, there is the usual mail-in registration card
to register the software with Alien Skin.
Okay, so what does Exposure do?
Exposure is the first software I have ever seen specifically developed
to reproduce the effects of different film types through digital
means. The true nature of this software is not released until
you begin playing with it to see what it is capable of. At a $199
price point, a plug-in better do something serious for me other
than what I can whip out in Photoshop in 5 minutes, or believe
me - I will not be a happy customer. Well, the good news is Exposure
is capable of producing effects in images that would take even
Photoshop experts a long time to produce through manual means.
In fact, some of the grain properties in Exposure would be nearly
impossible to replicate in real world situations by most photographers.
User Interface
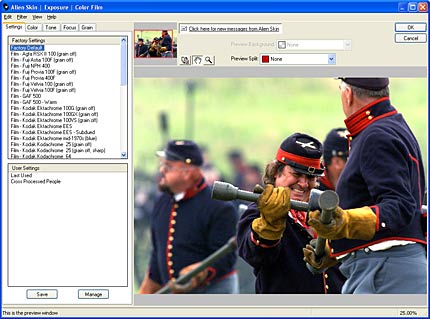
The interface of Exposure is in the form of a pop-up
that contains all of the menus and selections we need to control
the various features of the plug-in. I find the interface to be
intuitive and easy to use without much thought being given to
figure out what a specific tab or menu item's purpose is. All
of the main menu controls are located on the left pane of the
window with the image and control selections being located on
the right side.
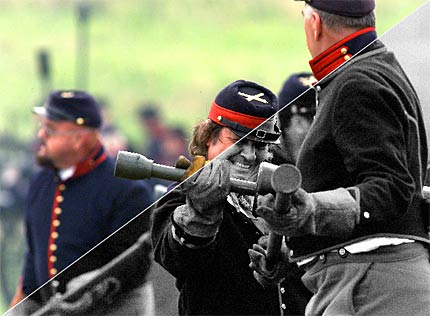
One of the most interesting and exciting features of the user
interface is the "Preview Split" functionality where
we can see the image before it is manipulated by Exposure on one
side and the final image product after processing on the other
side. This is a really unique feature that makes it very easy
to see what's happening with the image in real time as we are
selecting colors, changing contrast, etc. A before / after toggle
button can also be pressed in addition to having the preview split
function to see the entire image as-is in its unedited state and
after the filter is applied. The split bar can even be moved to
different parts of the image to provide you with the split set
up that suits you best. I prefer the diagonal bottom right set
up that defaults when the plug-in is opened.
Program Menus
Settings Menu
One of the most exciting aspects of Exposure is the "Settings"
menu, which contains a set of 35 preset film emulation filter
settings, in addition to a host of other presets emulating toning
processes, grain settings in mid tones and shadows, and even special
presets to make your images look like a 19th Century calotype,
or Daguerreotype. In case you want to experiment with Daguerreotypes,
but are not into messing with raw silver halides, or mercury for
that matter, then you can do it with this software by pointing
with your mouse and pecking at your keyboard.
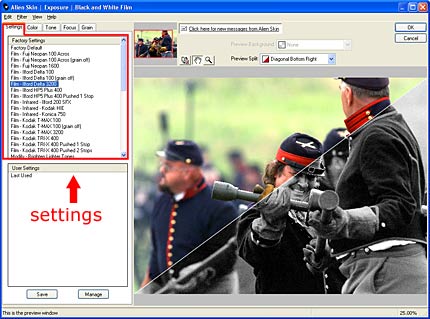
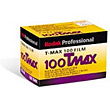
Some of the more well known films included in the factory settings
list include: Fuji Provia 100F; Kodak Ektachrome 100VS; the Kodak
T-MAX lineup of films; Kodak Tri-X 400 among several others. Lesser
known and even long extinct film types represented include: GAF
500; Kodak Ektachrome mid-1970's and Kodachrome 25. One film type
I would really like to see included in the factory settings list
is Fuji Velvia 50. As a landscape photographer at heart, my film
of choice for shooting landscapes when I was shooting analog was
Velvia 50. Where is it?
Adding to the Settings menu's capabilities is the ability to
save and manage your own "User Settings" providing you
with the ability to save an unlimited number of combinations between
the various controls available in the program. You can even export
your settings and save them on your hard drive, CD, etc. for safe-keeping
and future use. Since the settings are saved in a file type format,
your settings can even be e-mailed your settings to friends or
colleagues and allow them to use your own settings recipe. Wouldn't
it be nice if every image editing software would give us this
capability?
Color Menu / Color Film Mode
The Color menu provides us with the ability to tweak colors exactly
to our liking. In the "Color Film" mode (found under
the Filter top menu), we can add what can be likened to a color
filter to our images. The intensity (which can be compared to
opacity for Photoshop users) gives us the ability to control the
overall effect of the color filter on our image. A nice feature
I found just above the intensity slider is a checkbox to create
the output of the filter on a layer above the current layer. This
mimics the creation of a layer in other image editing software
and provides a non-destructive method to applying the filter to
the image.
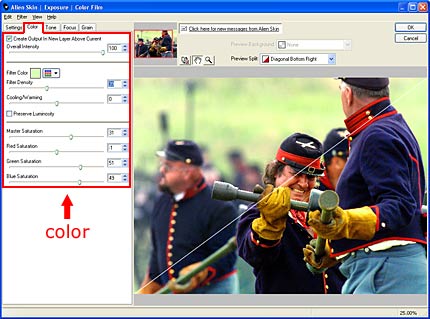
Further along in the Color menu we find a color palette where
we can choose the exact color for the filter, a "Filter Density"
slider that controls the overall effect of the filter, and a checkbox
to "Preserve Luminosity" in the image when the filter
is applied. This little checkbox selection will keep the image's
luminosity on an even keel no matter what selections you make
in the Color selections. What this means is your image will remain
at the same constant luminosity at all times and you will not
see the image becoming "blocked up" by the addition
of the digital color filter you are applying. Think of this as
a way to open up your aperture when you place a dark filter in
front of your lens.
The final selections in the Color Film version of the Color menu
include separate controls for Master, Red, Green, and Blue saturation
in the image. From what I could tell through my experimentation,
these controls provided very specific saturation changes in the
color filter, which seem to be easier to use than the saturation
controls in Photoshop. This is because you are only controlling
the saturation of the color filter and not the entire image. The
fine tuning of color in your images is quite astonishing when
you begin to play with these controls.
Color Menu / Black and White Film mode
In Black and White Film mode, the Color menu gives us the ability
to convert color images to digital black and white format. One
of digital photography's most difficult issues for most photographers
is being able to accurately reproduce accurate black and white
representations of our images in a digital format. We either find
ourselves playing around with the channel mixer in Photoshop and
doing our best to do something there that may get close to what
we are looking for, or we go through a hundred different steps
with layers, contrast settings, etc. to come up with a respectable
black and white product.
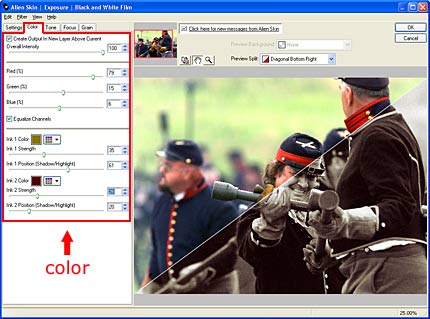
When using Exposure's Color mode to reproduce a black and white
image through the use of its channel mixer and Settings menu for
specific film types, not only am I able to accurately reproduce
my favorite look from Kodak Tri-X 400 film, but I can also see
the grain in the image just like it is in the real film! The grain
in the image is not just a random scattering of equally sized
pixels. This grain is true to form with different sizes depicted
and even variations in light on the grain itself.
Another great feature of the color menu in Black and White mode
is the "Ink" that can be used to tone the image. With
the color palette and slider menus for strength of the colors,
I can create a duotoned image in a few clicks and slides of the
mouse. The positioning of the ink can even be selected to affect
either the shadows or highlights Wow! This is an impressive feature.
Tone Menu
For those of you who run away when you see the Curves menu in
your image editing software, you really should get into this section
of Exposure to try out its tone effects on your images. The developers
have made it easy for us to manipulate the curve by applying a
predefined s-curve to the initial curve for us. We can move the
points around on the curve to see what happens with the tone when
we do. It's really quite easy once you play with the points for
a bit.
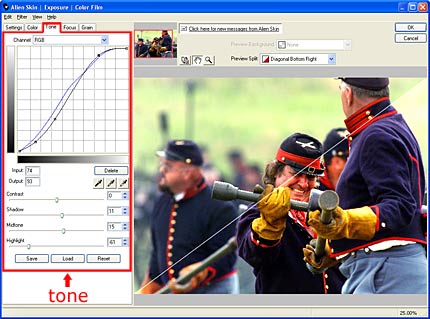
In addition to the curve feature, we also have an overall contrast
setting and shadow, midtone, and highlight sliders to control
all aspects of the tonal quality of the image with accurate precision.
The great part about the sliders is the fact that we can actually
see what is happening with the tone / curve at the top of the
pane when the sliders are moved. How cool is that? This takes
the guesswork out of playing around with a curve and it even helps
us visualize what is happening with the curve when certain areas
of the tonal range are manipulated. I consider this feature to
be a built-in teaching module for those of us who are always fumbling
around with the curves in search of that perfect tonal quality.
Focus Menu
Okay. You're probably thinking, "What do I need this for?
Isn't this something I can do in my editing software?" Well,
yes you can. However, normal image editing software such as Photoshop,
or Paint Shop Pro can be difficult to manipulate when it comes
to sharpening images. If an image is over sharpened, it will have
a detrimental effect on the quality of the image that can be recognized
by general viewers of the image, not just professional photographers.
Sure, there are ways to mask images and create actions in Photoshop
that will allow us to sharpen an image with the unsharpen mask
to make the image presentation look accurate, but just how difficult
is it to do this?
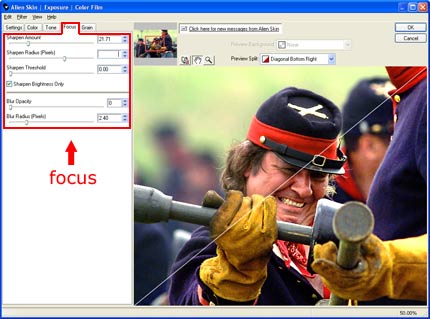
With Exposure, the sharpening problem is tackled by a simple
menu of sliders that control the amount, radius (size), and threshold
(this setting determines how much tonal difference must exist
between two pixels before sharpening is applied). The real beauty
of this sharpening system is the "Sharpen Brightness Only"
checkbox, which allows us to define the sharpening to a great
extent and reduce the problems found in traditional sharpening
methods including artifacting, color halos, etc. This is a must-have
to create sharpened color images that don't look like they were
digitally manipulated. Since this setting is only useful for color
images, it is not found on the Black and White Film setting.
The other control available in the Focus menu is the Blur tool.
This tool provides us with the ability to manipulate the perceived
focus of an image to reduce skin blemishes and wrinkles, etc.
It's a very easy tool to use that gets me really excited when
I try it out on portraits. This tool makes it simple to create
a soft focus effect for great portrait results.
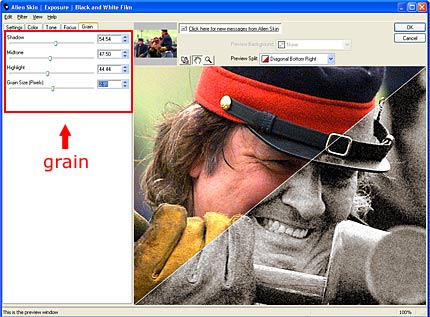
Grain
This is probably my favorite part of Exposure. For years, I have
attempted to reproduce film grain in digital images, but it never
seems to have the quality of real film grain produced by silver
halides during processing. In my quest to reproduce this grain
effect through digital means, I have been let down by what I have
been able to come up with in Photoshop. My usual result is a grain
pattern that looks good, but not quite natural enough. The biggest
problem I find is the similar sizing of the "grains"
and the near uniformity of their existence across the image. Real
grain is very diverse in size and pattern – there is no
uniformity at all. This is especially true when it comes to old
photographs from the 19th Century.
For my digital photography of Civil War battle reenactments where
I produce sepia toned prints with lots of grain, achieving an
accurate representation of the grain detail and pattern is crucial
to presenting final printed photographs to Civil War buffs who
are very keen on seeing nuances in time period photographs. If
a modern digital photograph does not match up to the real 19th
Century image, they will know right away. Of course, it is not
possible to reproduce the images from the 19th Century with digital
cameras, but it is possible to simulate the look closely enough
to make these Civil War experts rub their chins for at least a
few seconds before they determine the photo is one from 21st Century
technology.
With Exposure, my prayers have been answered for the creation
of film grain in digital images. I am amazed by the amount of
control this menu affords us to creating an image that looks like
it has a realistic grain pattern. Not only can the grain size
be chosen, but it can also be manipulated through how much it
applies to each tonal portion of the image. By having the ability
to modify the grain variances in the shadows, midtones, and highlights
of the image, we can pin down the grain to just the look we are
after. What’s more is the fact that the software’s
developer’s actually analyzed grain patterns with microscopes
of each film type they included in the factory settings! It doesn’t
get much more realistic than this when it comes to grain.
Conclusion
Overall, my review of Exposure is a positive one and I can see
its ease of use and flexibility in modifying the subtleties of
images through simple controls a major benefit for all photographers
who are shooting in digital format.
Pros
- Ease of installation and use
- Accurate reproduction of film types
- Great grain!
Cons
- A “Preferences” menu tab that does nothing more
than check for product updates and offers. This seems to be
a misnomer to me. Maybe it should be located above the image
pane, or as part of the “Help” tab in the menu.
Preferences usually provide users with the ability to set specific
controls in a program.
- Where is Velvia 50? I would not gripe about this, but it is
one of the most popular landscape films of all-time.
Exposure Details
Pricing and Availability: Exposure sells for
an estimated street price of $199. Registered users of other Alien
Skin products receive discount pricing when ordering direct. Online
delivery is available at the Alien Skin website: http://www.alienskin.com.
Exposure is also available worldwide through stores, catalogs
and resellers.
Host Requirements: Exposure is a plug-in and
will require one of the following: Adobe Photoshop CS or later,
Adobe Photoshop Elements® 3 or later, Macromedia® Fireworks®
MX 2004 or later, Jasc® Paint Shop ProTM 9 or later.
System Requirements: Windows users must have
at least a 2 GHz Pentium 4 processor, 256 MB RAM and Windows 2000
or Windows XP. Macintosh users must have at least a 1 GHz PowerPC
G4 processor, 256 MB RAM and Mac OS X 10.3.8 or later.
About Alien Skin Software: Alien Skin Software
develops filters for Adobe Photoshop, Photoshop Elements, Macromedia
Fireworks, and Jasc Paint Shop Pro. Graphic designers and digital
photographers everywhere use our plug-ins for print, Web, and
photo restoration work. Makers of award-winning plug-ins since
1994, Alien Skin Software writes and sells filters that users
love.
Visit Alien Skin Software at: http://www.alienskin.com
About the author:
Larry Davis is a professional
photographer, web designer and author. He is also the President
of Profotos.com. Larry's work has been seen by thousands of people
around the globe through the online web sites he has produced.
As an avid photographer, Larry enjoys photographing the landscape
and the natural environment. You can see Larry's work on Profotos.com.
You can see more of Larry's
work at the following websites:
www.larry-davis.com
www.incredipics.com