The Zone System Part Five
No Magic!
by Lars Kjellberg
By Lars Kjellberg It is not that often that we
get the chance to use the zone system to its full extent. In principle
it would require working with a large format camera so that you
can process every negative individually. However, it is not necessary
to stick grimly to the zone system's principles. You will get
far just by learning how it works and by using the parts that
can be usefully applied each time you take photographs.
The two main principles important to remember
are 1) that exposure controls the dark tones and 2) that development
(or paper grade) controls the lighter tones. When you have taken
these principles on board and use them when taking photographs,
you will find your negatives will be much easier to print.
Avoid Underexposure
When you stand looking at an object you want to photograph, trying
to decide what you want in the way of exposure and development,
you should ask yourself two questions.
1) How high is the contrast of the object? If
you have direct sunlight from a clear sky to cope with, you should
plan on reducing the development time in order to reduce the contrast.
If you reduce the development time you may also have a problem
with a slight reduction in film speed. This has to be compensated
for when taking the photograph.
2) Which of the darkest parts do I want to be
able to see? Choose an exposure setting accordingly. It is better
to expose a little too much than not enough. A slight overexposure
can be compensated for by using longer exposure times when printing.
An underexposure can never be completely compensated for, either
in development or printing. Avoid underexposure!
It is of little importance whether the picture's
contrast is adjusted when developing the film or by using different
grades of paper when printing. It is difficult to detect any difference
between a picture printed from a soft negative on a high-contrast
paper and a picture printed from a hard negative on a low-contrast
paper. It is also difficult to see any difference between a print
from a normally exposed negative and one from a slightly overexposed
negative. On the other hand, it is all too easy to tell apart
a picture printed from an underexposed negative and a picture
printed from a normally exposed negative, since the underexposed
negative will have no detail in the shadows.
Roll Film
It is easy to see that you cannot develop every picture on a roll
of film separately. When using a roll of film it is therefore
best to decide the kind of development you want before you take
your photographs. Consider the light and the contrast, and decide
whether you can use a normal development, or whether it will have
to be plus or minus. Then shoot the whole roll as carefully as
possible. It is a good idea even to make notes of the grade of
paper the negatives should be printed on. If it turns out that
you need a plus development for a film that you had already decided
to develop normally, you simply print on a higher-contrast paper.
Printing will be easier if you have made a note of this while
you were taking the photographs.
Since graininess in the negative increases when using a plus
development, it is best to avoid plus development when using high
speed 35 mm films. It is preferable to print on higher-contrast
paper. Adams supposedly minus 1 developed his 35 mm Tri-X film
to avoid graininess. When working with sheet film the grain is
far less obvious, which means that plus-development can be used
without problem.
Evaluation
A knowledge of the zone system is also handy in evaluating negatives
and prints. It becomes easy to see if a negative is underexposed,
normal, or overexposed. Place the negative on a light table and
look at the areas that are in shadow. Is there enough detail?
Are there empty black holes without any texture? Empty holes are
not what we are after: next time, increase the exposure.
The quality of the development is judged by looking at the finished
print. Is the contrast balanced? Would we have preferred a higher
or lower contrast? If the prints are too soft you will need to
increase the development time. There is no Film X that is 'uncommonly
high contrast', or indeed a Film Y that 'is suitable for sunlight
because of its low contrast'. All films can be developed to be
high or low in contrast. It is only a matter of changing the development
time.
Visualisation
Ansel Adams came up with a concept that he called 'visualisation'.
This means that when looking at the object you are about to photograph,
you should try to envision the finished print. Try to disregard
the object's colour, movement, smell, feel, and three-dimensional
character. What remains is a black and white, two-dimensional,
static picture, without smell, feel, or taste.
There are certain tricks that can be used to simplify visualisation.
You can close one eye and squint with the other. Try looking at
the object through a Kodak Wratten 90 filter: it is dark yellowish-green
in colour, and cancels out the object's colours. Try to picture
what the object will look like, with all its shadows, middle tones,
and highlights. Then choose the zones you want the different parts
of the object to be placed in.
The Spot Meter
A spot meter is the best tool to help you choose the exposure.
It measures light reflected from a very small area of the object.
Most spot meters have a measuring angle of only one degree, which
makes it possible to measure small details all over the entire
object.
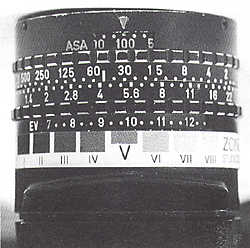
You can stick a zone scale onto your spot meter's setting ring.
Zone V should be placed in front of the spot that indicates a
standard exposure.
Point the meter at one of the object's dark surfaces
and read off the value. Turn the setting ring so that that value
is next to the Zone in which you wish the detail to be placed;
Zone III, for example. The value next to Zone V is the exposure
setting you should use. It is now time to see which zones the
highlights fall into. Point the meter at a bright part of the
object and read off the zone it falls into. Are you satisfied
with this, or do you want to adjust it with different development
times or paper grades? If you want the bright area moved up one
zone, it can be achieved either by using plus 1 development or
by printing the picture on a paper that is one grade higher in
contrast.
Measuring with the camera
You can also draw an exposure scale in your notebook. Point the
camera at the dark part of the object and take a reading. If,
for example, we have a reading of f11 and 1/8 seconds, you write
11/8 next to the zone that you want the dark part placed; for
example, Zone III. Fill in the rest of the scale, reckoning on
an increase of one exposure stop for every zone. In the box by
Zone V, for example, you will have 11/30. Now measure a brighter
part of the object, and see where it falls. If the meter reads
11/250, it will be placed in Zone VIII. Are you satisfied, or
do you want to adjust it?
The all-important printing
The whole point of the zone system is to provide you with good
negatives that are easy to print. When it comes to the actual
printing, you can forget the zone system completely. Ansel Adams
compared printing to playing music. The negative is the score
and the print is the music as it is performed. Put the score in
the hands of five different conductors and the music will sound
different every time. You will recognise it, but it has been interpreted
in five different ways. The same holds good for photographic negatives.
Give five printers the same negative and they will give you five
different prints. You can see that the prints have been made from
the same negative, but you will have five different interpretations.
It is in printing that the small but all-important details are
decided upon; choice of photographic paper, dodging, burning,
toning, and so on. This is something we will return to in another
series of articles.
No Magic
The zone system was invented some fifty years ago as a means of
controlling exposure and contrast. Over the years it has become
shrouded in myth, and has been raised to the level of metaphysics
by people who do not really understand it. The zone system is
easy and logical. It has been abused by people who claim that
their otherwise mediocre pictures are great art because they used
the 'difficult zone system' to take them.
Many are led to believe that the method is time-consuming, requires
weeks of preparation, and inhibits creativity. But if you use
the zone system in a suitably personal way, you will have a wonderful
tool that will enhance rather than inhibit your photography.
Practice Makes Perfect
Almost every adult can ride a bike, a skill no-one is born with.
Everyone had to learn how to do it. Despite all the mistakes -
who hasn't lost their balance, or fallen off and grazed knees
and elbows? - we kept practising. When we finally mastered the
technique, we were elated. To stay vertical riding a bike was
success enough. That cycling could also be a form of transport
didn't enter our heads.
The zone system is exactly the same. It is not something you are
born with, so you decide to learn it. You make many mistakes,
but keep going. At a certain point - invariably after a great
deal of practice - you feel that you have mastered it. You can
control the tonal qualities of your pictures. The zone system
all too easily becomes an end in itself.
But if you continue beyond this point, you will find that zone
technique becomes less important. You will use the zone system
to a greater or lesser extent, but only to serve your purposes.
The technique is always there in the background, just as cannot
forget how to ride a bike, and you will no longer get the exposure
wrong in your negatives. You acquire a confidence that improves
your pictures, regardless of the kind of photographs you take.
When we can ride a bike, we sometimes use it because it is the
best way of getting from A to B. In the same way, we can sometimes
choose to use the zone system because it is the best tool for
tonal control.
Error processing SSI file
You can see more articles and information
by Lars Kjellberg on the Photodo.com website - a great resource
for photographers around the world!