The Zone System - Part One
What is the Zone System?
(by Lars Kjellberg)
The zone system was invented by Ansel Adams, one of the most
famous photographers ever. He was a master of technique, and had
an eye for light that few are blessed with. His photographs were
the result of a happy combination of comprehensive technique and
the knack of taking a picture when the light was at its best.
A distinguishing feature of his black and white photographs is
how light and dark areas play off each other in an instantly appealing
manner.
Yet Adams did not approve of what he saw as the 'abuse' of his
zone system. As an old man, he thought far too many people had
misunderstood the method and burdened it with too much mystery.
Why had it turned out like that? Most likely it was poor communication
that was to blame: Ansel Adams was a much better photographer
than he was a teacher. His first books on the zone system are
very hard to follow. The final editions of 'The Negative' and
'The Print' are much better.
The Zone System is Simple
The zone system is very simple and its principles are logical
and easy to understand. Its scientific basis had been known long
before Ansel Adams and Fred Archer hit upon the method in the
1940s. The pioneers were Ferdinand Hurter and Vero Driffield who,
at the end of the nineteenth century, studied the way in which
light sensitive photographic materials reacted during exposure
and development. They succeeded in describing the properties of
light sensitive materials in a graph that showed what was termed
the H&D curve, a curve still in use today in sensitometry.
Art or Science?
Some of the difficulties in understanding the zone system
probably had to do with the conflict between art and science.
Is photography an art or a science? Is it in fact both? If you
decide photography is an art, it becomes difficult for some to
treat it as a science, and thus it inevitably becomes much harder
to grasp what is going on. If, on the other hand, you accept that
photography is both art and science, and understand its principles
on a scientific and logical basis, it becomes much easier. To
my mind this approach does not necessarily intrude upon the artistic
side of photography. On the contrary, a better understanding of
techniques can greatly improve personal creativity. When you really
understand what is happening, you can exploit to the full all
the means photography provides to express your artistic vision.
Visualisation, Exposure and Development
In brief, the zone system is made up of three basic components,
all of which were very important to Ansel Adams: visualisation,
exposure control, and contrast control.
Visualisation is not really a question of technique. It is a method
used to picture the finished photograph before it is taken, and
is useful for everybody, regardless of whether they are using
the zone system or not.
Exposure control is key, partly because it is important to learn
how your own photographic equipment works, and partly because
you want to choose a shutter speed and aperture that will provide
a negative with as much detail as possible. It is with exposure
that we control the reproduction of shadows.
Contrast is controlled by development and the contrast grade
of the paper used for printing. It is the contrast control that
determines how white the picture's light areas will become in
the finished photograph. You should learn to use a suitable development
time that will give you the contrast you are looking for.
Difficult Terms
Visualisation, exposure, and contrast control are terms that
are simple to understand. What can be confusing are the words
Ansel Adams used to describe exposure and contrast control: Zone
V or Zone III exposure, N-2 or N+1 development. However, we will
save these for later and concentrate first on a few basic requirements.
Brightness Levels
It is a common mistake to think that you only take one exposure
each time you press the shutter button. You take an exposure with
a specific aperture and at a specific speed. However, another
thing that affects the exposure is the reflected light from the
object you are photographing, and this can vary greatly for the
same object. The darkest details reflect less light than illuminated
white details. Normally we have a number of different exposures
every time we take a photograph. The object has many different
levels of brightness, sometimes ranging from black in the shade
to white in the sun. The range of exposure values is a result
of variations in both the incident light (sun and shade) and the
ways the object's various surfaces reflect light.
Measuring the range of the contrast in a picture is easy. It
is best to measure the contrast according to the number of exposure
stops from the darkest part of the picture to the lightest. One
exposure stop is the equivalent of a halving or doubling of brightness.
From 1/125 to 1/250 seconds is one exposure stop. From f5.6 to
f8 is also one exposure stop. By first pointing the light meter
at the darkest part of the picture and then the lightest, we can
calculate the number of exposure stops between them. Normally
there are seven stops between shaded black and illuminated white,
but it varies depending on how harsh the incident light is. Direct
sunlight on a clear day will give a very wide range of contrast,
while a grey, hazy day will give a low contrast with few exposure
stops between black and white. Normally, the contrast range varies
between five and nine stops.
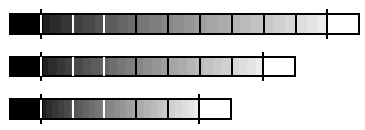
Nine stop contrast range, plus all black and all white
Seven stop contrast range, plus all black and all white
Five stop contrast range, plus all black and all white
Film's Exposure Latitude
Photographic film reacts to exposure. When film is developed,
the blackness increases to a large extent in proportion to the
exposure. A strong exposure (a white surface in sunlight) means
that development heavily darkens the negative. A weak exposure
(a black surface in shade) results in little darkening of the
developed negative.
However, film has its limitations. Very weak exposures will not
give any darkening at all, while very strong exposures do not
give any more darkening than slightly weaker exposures would.
The exposure must not be too weak or too strong. We are interested
in the range of exposures that lie between the two extremes of
underexposure and overexposure. We call this range the film's
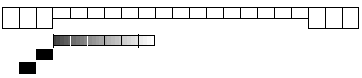
exposure latitude. A negative black and white film has a wide
exposure latitude of up to fifteen stops. This is much more than
the brightness range of almost all objects we might want to photograph.

A negative black and white film with an exposure latitude of
fifteen stops.
Ideal Exposure
When a film is going to be exposed in a camera, we have to
make sure that all the object's individual exposure values fall
within the film's exposure latitude. If we use too short an exposure
(too small an aperture or too fast a shutter speed) the darkest
areas of the object will end up outside the film's exposure latitude,
and the photograph will be underexposed. If we expose for too
long (too large an aperture or too long a shutter speed) we risk
overexposing the lightest parts of the object, giving flat, bright
areas devoid of contrast.
At a level of two stops underexposure, we will lose the two
darkest stops of the object.
The best results are achieved if we use as short an exposure
as possible without losing any of the shaded details. The way
to do this is to measure the darkest element in the object and
then pick a shutter speed and aperture as close to the threshold
value for underexposure as possible.

The ideal exposure is to place all the tones of the object
except all black, just within the films threshold to the left.
The reasons for choosing short exposures are the numerous advantages
we gain. We have the smallest possible aperture, something that
is generally desirable. We also have a fast shutter speed, which
again works to our advantage. We end up with negatives that are
not overly dark, thus shortening the exposure times when printing
the photographs. Last but not least, the negatives will have a
fine grain (the lighter parts of the negatives being more fine
grained than the darker), which is almost always preferable.
Photographic Paper's Dynamic Range
The point of taking a photograph is to produce a finished
picture on photographic paper. It is the blackening of the paper
that forms the image. In principle, a wide dynamic range produces
the best results. The paper is said to have a wide dynamic range
if it turns fully black in the darkest areas of the image and
is wholly white in the lightest areas, which means that there
is the widest scope for reproducing the image's details. One of
Adams' strengths was that he knew which material to use, and he
always used the best photographic papers.

A very good paper will have a dynamic range corresponding to
more than six exposure stops.
A paper's dynamic range can be measured with a densitometer,
and it can be described in terms of stops of exposure. A very
good paper will have a dynamic range of about six exposure stops.
If you compare this with the object to be photographed, which
normally will have a range of seven stops, you will see that the
paper can therefore reproduce the object's detail with little
or no compromise. If you choose a paper with a range of four stops,
the range of detail will have to be compressed to make it fit
the paper's capabilities. For some photographs this is not much
of a problem, indeed they can even benefit, but if we are looking
for a picture with a full grey scale running from black to white,
paper with a narrow dynamic range will not give particularly good-looking
results.
I want to stress that the point of using the zone system is not
always to produce this kind of photograph. Your aim should be
to learn how to take the kind of picture you want, regardless
of whether you want every last tonal detail, or whether you want
your picture to be soft and grey.
Exposure Controls Shadows
This is an old adage that most people have heard more than
once. What does it mean? Simply put, because it is normal to use
the shortest exposure possible that will still preserve those
details that are in shadow, you should get as close to the threshold
value for underexposure as you can. If you were to go too far,
the detail in the darkest shadows will be lost, and you will end
up with an underexposure. In deciding the exposure, we also decide
how much of the detail in the shadows will be kept. Exposure controls
shadows!
Development Controls Highlights
This is another adage that still holds good. The longer the
development time the higher the contrast, and the greater the
difference between black and white. If you print the photograph
so that the shadows come out right, the highlights will vary with
different development times. A longer time produces lighter highlights
and shorter time produces darker highlights. Development controls
the highlights!
Two Controls
What we have here are two controls, one for the darkest areas
and one for the lightest. Once we have accepted this way of thinking,
things become much easier. An object is made up of different tones
ranging from black to white. To produce pictures with a full tonal
scale you need to know how to control all the tones. To do that,
all you need to do is to adjust the darkest and the lightest parts
of the image. All other tones land between these two extremes,
and will automatically fall into the right places. You control
the darkest tones by learning how your camera and film react to
exposure (by calibrating your equipment) and by then choosing
an exposure that will ensure that the darkest tones will appear
on the negative (by exposing in the correct zone). After this,
you control contrast by picking a development time that ensures
that the lightest areas of the picture will be reproduced on the
photographic paper. The two controls are exposure and development.
It is that simple.
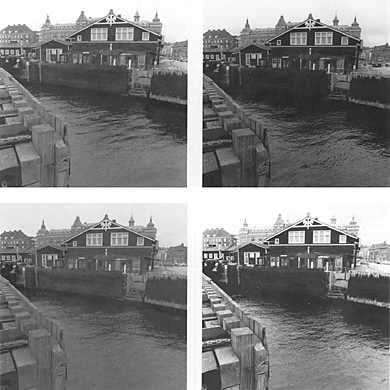
Top left: With correct exposure and correct development,
the image will get a full tonal range from dark tones to bright
highlights.
Top right: With two stops underexposure the result is
an image with lost shadow detail. With a longer exposure and/or
larger apertur opening, the shadows would have been correctly
exposed.
Bottom left: Less development gives lower over-all contrast
and in this case to gray high-lights. With 20% more development
this image would have been better.
Bottom right: Too much development gives to high contrast.
The high-lights are too white without any detail. 30% less development
would have been better.
Next month, we will continue with Part II of the Zone System
- Exposure.
Error processing SSI file
You can see more articles and information
by Lars Kjellberg on the Photodo.com website - a great resource
for photographers around the world!