| CONTACT US | FAQ'S | ||||||||||
 |
 |
 |
 |
 |
 |
 |
 |
 |
 |
|
|
|||||||||||||||||||||||||||||||||
|
|
|
|
|

|
An example, if the distance across the frame measures at 72mm the formula becomes 36/72 which equals ½ X or half life size. Lenses and AttachmentsThere we are chasing a butterfly around the garden with camera and standard lens. The butterfly lands on a colourful bloom, we sneak up and focus….. lets focus a little closer - d'oh! We can't!! A standard 50mm lens will only allow us to focus as close as about 60cm resulting in a paltry magnification of approximately 1/10 life size. So we need to focus the lens closer to the subject. Coincidently, that is why macro photography is often called "close-up" photography. Closer focusing is achieved by either a diopter attached to the front of a standard lens; or a spacer of some kind between body and lens to extend the lens towards your subject; or a specially designed lens which can extend itself towards the subject. Extra magnification can be achieved with any lens (wide angle to telephoto) by screwing diopters (also known as supplementary lenses) onto the filter thread of your lens. Diopters are light weight, simple to use and don't require any exposure corrections. Cheap diopters suffer from severe edge distortion and cannot achieve the high magnification of a macro lens without using a stack of them. The more bits of glass in front of your lens, the worse the result. Serious photographers could buy the much more expensive two-element supplementary lenses (such as those produced by Canon or Nikon), but why not save up for a real macro lens? A macro lens can focus from infinity to a magnification of 1:2 or 1:1 (depending on the age and brand of the lens) - without having to attach any accessories! A macro lens is designed so that there is edge to edge sharpness even at 1:1; therefore if you are filling the frame with a small postage stamp for example, everything will be in sharp focus - a standard lens would not cope so well. A note on autofocus (AF): it can become annoying in the close-up ranges as it moves back and forth with the slightest movement of the subject or the camera - most people switch the AF function off. Other lenses such as "macro zooms" allow the lens to be focused closer than normal but cannot achieve the magnifications of a macro lens nor the edge to edge sharpness. Certainly, true macro lenses are expensive, but if you are serious …. ? Higher magnifications can be achieved using extension tubes (made by most camera manufacturers) which allow macro lenses to focus even closer to the subject. Extension tubes are metal rings or tubes which can be used singly or in groups to extend the lens away from the camera body. They can be used in combination with any lens, but are best used in combination with a macro lens due to the reasons outlined above. The limitation of tubes is that they are of a fixed length. Theoretically you could keep adding tubes to achieve huge magnifications. But, there is a better way - bellows.
Exposure Increase FactorExtension tubes or bellows between the lens and camera body means a greater lens-to-film distance, which reduces the amount of light reaching the film. Exposure has to be increased to correctly expose a subject. The exposure increase factor (EIF) is determined by the following formula:
Automatic systems such as TTL exposure (whether ambient or flash) will automatically compensate for this light loss - but if your camera doesn't possess this function?? At this stage if we don't know the magnification and we don't have an auto exposure system, we won't be able to achieve a correct exposure! To find what the EIF actually means in terms of f-stops, we can use the formula:
Whoa!! What happens if you don't have a scientific calculator on hand?? If you don't wish to use these formulae (and assuming you have measured the magnification!!) you could use some general rules of thumb from the table below and plenty of bracketing.
Remember that you need to increase the exposure. This can be done by opening up the diaphragm by the correct amount of f-stops, by increasing the exposure time, or by moving your light source closer. FilmYou get what you pay for! Professional film is more expensive than amateur film, but will be more consistent in its colour reproduction from roll to roll than amateur film. Pro film is stored in refrigerators to keep the emulsion stable, amateur film is not. A roll may have been in a box for 3 months in 30oC heat, before it even got to the store you bought it from - or it may be fine. I never take the risk. The lower the ISO rating of a film, the finer the grain; the finer the grain the better the film is able to record fine detail. Most modern emulsions between ISO 50 to ISO 100 can record fine details reasonably well, but will vary slightly in colour bias. Fuji films (such as Fujichrome Velvia) are said to be warm and saturated, but Kodak has recently produced similar films including the souped up E100VS. Ultimately it's a personal choice - but whatever film you choose you should become familiar with its characteristics and limitations! A Note on DigitalDigital cameras have their place and I have used them on occasions. I am not convinced that their ability to resolve fine detail is as good as film, and I can't afford the $30K+ for a professional digital camera. Don't be fooled by what you see on a computer screen at 72dpi - it will not translate to an A4 magazine page at 300dpi!! In the Field MacroMacro live insect photography is best achieved with flash. These flashes can be cheap and small and need not necessarily be TTL - if you understand the formulae and can use a flash meter!! The flash should recycle quickly after firing. There is nothing worse than missing a great shot because you are waiting for your flashes to recycle! Small flashes which take four AA batteries have very fast recycling times indeed - one of my little flashes is ready to fire again in only 2 seconds! I am not a great fan of ringflashes. They produce flat shadowless lighting and if you are shooting a shiny beetle you will see a perfect ring reflection on its back. They are also much more expensive than ordinary flashes. How do you attach a flash to a camera to shoot insects and other fast moving critters in the field?? You can't sit your flash on the hotshoe because most of the light will pass straight over the subject - try it and see what I mean. You can bounce the flash off a white card but there is a lot of light lost. The flash has to come off the hotshoe and be positioned over the lens to point obliquely down at the subject. I used to use a bizarre contraption built out of coat hangers until I saw a design made famous by John Shaw. Yes, you can buy purchase similar units, but it is infinitely cheaper to make your own - mine cost about $20. A couple of lengths of aluminium strip, a ball and socket head, a few knobs and a hotshoe - and there you have it. Flash photography in the field is one of my favourite things. I have several cheap manual units (the brand doesn't matter - as long as it fires) and a couple of TTL models (compatible with my cameras) to choose from. TTL flash is a wonderful thing if you only have time for a "grab" shot. I use manual flash when I have more time, as it is easier for me to bracket with an aperture ring than use the compensation dial when in TTL mode - just a personal thing. I rarely shoot beyond 1X magnification in the field (hand held) and never beyond 2X - I just can't hold the camera steady enough! If I have time I set up a tripod - but the subjects I shoot are fairly frenetic so the tripod often stays in the car! With practice you can simply set up your camera, macro lens and flash bracket and spend many happy moments hunting suitable subjects. If you find you are getting really harsh shadows try taping a piece of tracing paper over the head of the flash! Natural light shots of insects are possible of course, as long as the subject is not moving! I find I need a tripod to render the image truly sharp - by that I mean that the image is still sharp when viewed with an 8X loupe on a light box (a standard publication check). The eggs, pupae and larvae of insects can be easily shot under natural light, assuming the leaf or branch they are on is not swaying in the breeze uncontrollably. Adult insects are another matter. If the time of day you shoot is warm there is no end to the frustration of following a butterfly, watching it land, moving camera and tripod into position, framing the shot and then watching it fly away before you trigger the shutter!! What can we do about that?? Shoot at dawn when the weather is cool and still, and the insects haven't had time to warm up. The Home Studio - Super MacroFor high magnification work I move indoors. The stability of a solid table top, a sturdy tripod, fine grain film and a flash system allows me to image very small insects sharply. I gain high magnification with my bellows and an assortment of lenses. You may have heard of reversing a lens. A normal lens is designed to work best when the lens-to-subject distance exceeds the film-to-lens distance. With bellows extension past 1X this situation no longer occurs as the lens is much closer to the subject, and there is a loss of quality as the lens is no longer doing what it is supposed to. Reversing the lens on a reverse mounting adaptor solves this problem and increases magnification further - trust me it does. There are big problems though. The rear element of your lens is unprotected, the meter coupling is no longer attached to the camera and the focusing ring is rendered useless (you have to focus with the bellows). Nevertheless, it can be done and I have achieved some great shots up to 8X magnification with a reversed lens. The best results at high magnification are achieved with lenses that are designed specifically for high magnification photomacrography. I have seen these described variously as "true-macro" lenses, "micro-lenses", "short-mount" macro lenses, and "macro-objective" lenses. Huh?! Each lens is designed to give its best performance within a specific magnification range. The most famous (and most expensive) of these lenses are the Zeiss Luminars and the Leitz Photars. I have had the pleasure of using these and, believe me, they are exceptionally sharp. Unfortunately my budget precludes me from actually owning them! Various other manufacturers, including Canon, Schneider, Minolta, Nikon, Olympus and Polaroid have all made (or still make) similar lenses. They all have several things in common. They have no built-in focusing ability and therefore must be mounted to a bellows, are very simple with few elements, are much smaller than standard lenses, and are generally tapered at the front to allow easier lighting of the subject. They also have a screw mount! Most have the standard microscope thread of about 20mm in diameter (known as RMS) - but some (like the Polaroid lenses) have different threads (here we go again!). So how do you mount it on a camera or bellows?? Don't bother asking camera stores, camera manufacturers or even microscope suppliers - I tried and it got me nowhere fast. The answer is to think laterally. Some people drill holes in body caps and gaffer tape the lens in place, but I wanted something a bit more robust. I just had to get my head around the idea of how to attach a small screw thread to a camera bayonet mount. The solution was to put a reversing ring on the camera - suddenly the bayonet mount had become another screw thread! I then had a local engineering firm cut appropriate threads into the ends of a piece of pipe - one end to take the RMS thread and the other end to accept the reversing ring thread. Simple. Our wasp (remember the assignment) was eventually imaged at 12X (12:1) magnification and lit with 2 flashes. The magnification was achieved by mounting a 25mm Minolta micro-lens on my bellows in the manner described. A magnification as large as that required a huge amount of light - use the formulae to see how much I had to increase my exposure by! The flashes were very close indeed. I couldn't push the lens beyond 12X as the image began to break up. This is a problem (known as diffraction) which is apparent in all lenses at high magnification. It is caused by light bending around the edges of the diaphragm - the closer the subject the more bending occurs. The way to minimise this is not to shut the diaphragm down fully - but there are limits to how far you can push any lens. Apart from loss of light at high magnifications there is another problem - incredibly small depths of field! Regardless of the f-stop you use on any focal length lens, the closer the lens is to the subject, the shallower the depth of field will be. For example, the depth of field at 8:1 magnification ratio with a lens set at f/32 is only 0.3 mm. Bear in mind that we can't shut the diaphragm that far down because of diffraction!! The depth of field with our wasp was less than 0.1mm! The best thing to do in this situation is to focus on the important parts of the subject and keep as much of the subject as possible parallel to the film plane. This is also true for larger subjects such as butterflies or flowers. If you are shooting a butterfly at 1:1 magnification ratio and your lens is set to f/11 you still only have a depth of field of 1.5 mm! Photomacrography is an exercise in compromise! The RewardsNo, you don't get a prize for reading this article! If you can master all the techniques outlined here, overcome all the problems and learn to live with the compromises, there is no end to what you can shoot! I have talked here about photographing insects only - what about nuts and bolts, electronic bits and pieces, flowers, the texture of cloth or wood or skin or... This article is copyright Denis Crawford - Graphic Science and should not be reproduced without permission or acknowledgment. About the Author: Denis Crawford is a professional photographer who resides in the Victoria area of Australia. Denis has worked in the photographic medium since the early 1990's and he regularly travels to document specimens for educational purposes. Along with his background in photography, Denis also has extensive knowledge in entomology. You can see more of Denis's work at his website: |
||||||||||||||||||||||||||||
| Questions, Comments? Look
here: The
help section Broken link(s)? Email us at: Testimonials. Visitor/Member Comments: News about us! |
FREE SCHOOL INFO
Select "Photography" under
Program of Study to see
Photo Schools
|
|
|
|
profotos.com: HELP | ADVERTISING INFO | CONTACT US | SITE MAP | FAQ's | ABOUT US Copyright ©1999-2011 Profotos.com (an independently owned company). All rights reserved. Terms of Use and Privacy Policy and Safety Information are applicable to this site. Our Address: Profotos.com, 681 Inverness Drive, Fairborn, OH 45324 USA Contact us via telephone: 937-660-0845 |
 The
assignment from the University was quite clear- "we would
like a nice image of this wasp for our web site please".
The wasp was quite beautiful with its bright red eyes, golden
body and iridescent wings. There was only one problem - it was
less than 1mm in length! And it had to be photographed alive!
The
assignment from the University was quite clear- "we would
like a nice image of this wasp for our web site please".
The wasp was quite beautiful with its bright red eyes, golden
body and iridescent wings. There was only one problem - it was
less than 1mm in length! And it had to be photographed alive!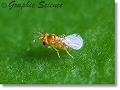 A
bellows attachment allows us to vary magnification continuously
- as you extend the lens out the magnification increases accordingly.
For example the bellows I use allows me to vary my extension from
48mm to 208mm as I extend the bellows out, which varies the magnification
from 1 X to 4.5 X with a 55mm lens. Thus I can photograph a moth
and then "zoom in" on its head without changing lenses
or accessories. Bellows have several limitations. They must be
mounted on a tripod - I don't see the point in attempting to hand
hold such a cumbersome piece of equipment. The bellows material
is easily damaged in the field by thorns or other sharp objects,
and bellows aren't cheap! Bellows require a double cable release
to preserve automatic diaphragm operation - one cable releases
the shutter, while the other closes down the diaphragm to the
set f-stop. The major manufacturers such as Nikon, Canon,
Olympus, Pentax, Leica and Minolta have made or still make bellows.
The accessory manufacturer Novoflex makes bellows which will attach
to most cameras with an appropriate adaptor.
A
bellows attachment allows us to vary magnification continuously
- as you extend the lens out the magnification increases accordingly.
For example the bellows I use allows me to vary my extension from
48mm to 208mm as I extend the bellows out, which varies the magnification
from 1 X to 4.5 X with a 55mm lens. Thus I can photograph a moth
and then "zoom in" on its head without changing lenses
or accessories. Bellows have several limitations. They must be
mounted on a tripod - I don't see the point in attempting to hand
hold such a cumbersome piece of equipment. The bellows material
is easily damaged in the field by thorns or other sharp objects,
and bellows aren't cheap! Bellows require a double cable release
to preserve automatic diaphragm operation - one cable releases
the shutter, while the other closes down the diaphragm to the
set f-stop. The major manufacturers such as Nikon, Canon,
Olympus, Pentax, Leica and Minolta have made or still make bellows.
The accessory manufacturer Novoflex makes bellows which will attach
to most cameras with an appropriate adaptor.